
You can customize the NVivo menus, toolbars and views to suit the way you work. When you close your project, your customizations are saved. If you share NVivo with other users on the same computer, any customizations you make, will apply only to you.
You can arrange views to suit your requirements. For example, when coding you can have a list of nodes and a document displayed vertically side-by-side.
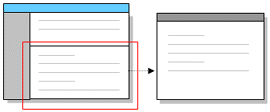
On the View menu, click DetailView.
Click the Right option.
OR
Click the Detail View Right or Detail View Bottom buttons on the View toolbar:
|
| |
|
|
When displayed vertically, the List View for nodes displays only the name column—the columns for Sources, References, Created and Modified are hidden.
|
|
|
You can hide the Navigation View, and use the Go menu to navigate between sources, nodes and other project items.
To hide/show the Navigation View; on the View menu, clickNavigation View.
Customizing the buttons on Navigation View
You can customize the Navigation View— for example, you can hide buttons or re-order buttons.
To change the Navigation View display:
Click the configure button at the bottom of the Navigation View.

Select the required display settings.
You can undock DetailView to work with the contents in a separate window:
With an item open in Detail View, click the Window menu, then click the Docked option.
To re-dock a window, click the Docked option from the Window menu in the undocked window.
You can also choose to Dock or UndockAll items opened in DetailView.
Adding columns to the List View
When you are working with project items in List View, you can add columns to display more information. For example, if you have set up nicknames for your nodes, you may want to show the Nickname column. The available columns will vary depending on the project items currently displayed in the List View.
To add List View columns:
In Navigation View, click on the required project item folder—for example, the Internals or Tree Nodes folders.
The project items are displayed in List View.
Click in the List View.
On the View menu, click List View.
Click Customize Current View.
The Customize Current View dialog box is displayed
Under Available columns, select the column you want to add.
Click the >> (add) button.
Click the up or down arrow buttons to order the columns in the Selected columns list. This order corresponds to the order that the columns are displayed in the List View from left (up) to right (down).
Click OK.
Removing columns from the List View
You can remove columns from the List View to hide information. For example, if you are working alone on your project, you may want to remove the Created By and Modified By columns.
Some columns are required as identifiers for the project item and cannot be removed. For example, you cannot remove the Icon and Name columns. The columns required as identifiers vary depending on the type of project item—for example, relationships require the Direction column.
To remove List View columns:
In Navigation View, click on the required project item folder—for example, the Internals or Tree Nodes folders.
The project items are displayed in List View.
Click in the List View.
On the View menu, click List View.
Click Customize Current View.
The Customize Current View dialog box is displayed.
Under Selected columns, select the column you want to remove.
Click the << (remove) button.
Click OK.
Reordering columns in the List View
You can reorder columns in List View to suit the way you work—for example, if you are working in a team, you might prefer to show the Created By column to the left of the Created On column.
To reorder List View columns:
In Navigation View, click on the required item folder—for example, the Internals or Tree Nodes folders.
The project items are displayed in List View.
Click in the List View.
On the View menu, click List View.
Click Customize Current View.
The Customize Current View dialog box is displayed
Under Selected columns, select the column you want to move to the left or right.
Click the up or down arrow buttons to order the column in the Selected columns list. This order corresponds to the order that columns are displayed in the List View from left (up) to right (down).
Click OK.
Resetting List View customizations
You can reset List View customizations back to 'factory settings'. You can choose to reset all List View customizations or only customizations for particular project items—for example, Internals or Tree nodes.
To reset List View customizations for specific project items:
In Navigation View, click the required project item folder—for example, the Internals or Tree Nodes folders.
The project items are displayed in List View.
Click in the List View.
On the View menu, click List View.
Click Customize Current View.
The Customize Current View dialog box is displayed
Click the Reset button.
The Selected columns are reset back to factory settings.
Click OK.
To reset all your List View customizations:
On the Tools menu, click ResetCustomizations.
The Reset Customizations dialog box is displayed.
|
|
By default, NVivo will reset all your customizations to toolbars, menus and List Views. |
|
|
|
If you want to keep your toolbar and menu customizations, clear the Toolbars and menus check box.
Click OK.
|
|
If the List View is showing 'thumbnails', you must change it to show 'details' before you can add, remove or reorder columns. To change the display, click in theList View, and then select View>List View>Details |
|
|
|
To resize columns in List or DetailView:
|
|
Click and drag the border |
To sort the items in List or DetailView:
Click the required column header. For example, to sort items by their creation date, click the Created column header.
You can also sort items by clicking the View menu and clicking the Sort By option. Refer to Sorting Sources and Sorting Nodes for more information.
Hiding child node column headings
When working with tree nodes in the ListView you can simplify the display by hiding the child node column headers. To hide the column headers:
On the View menu, click the Child Node Headers option.
You can add, remove or rearrange options on your NVivo menus:
On the Tools menu, click Customize.
Click the Commands tab.
Click RearrangeCommands.
From the Menu Bar drop down list, select a menu to rearrange.
To customize the selected menu, use the Add, Delete, Move Up and Move Down buttons.
To apply the changes, click Close.
OR
To revert the selected menu back to its original configuration, click Reset.
Adding and removing buttons from toolbars
On the Tools menu, click Customize.
The Customize dialog box is displayed.
In the Toolbars tab, select the toolbars you want to display.
|
|
You cannot hide the Main Menu bar. |
|
|
|
In the Commands tab, click Rearrange Commands.
Select Toolbar.
From the drop down list, choose a bar to rearrange.
To customize the selected toolbar, use the Add, Delete,Move Up andMove Down buttons.
To apply the changes, click Close.
OR
To revert the selected toolbar back to its original configuration, click Reset.
In the Options tab, set information about how menus are displayed.
To apply the changes, click Close.
You can also create a new toolbar to contain the commands you most frequently use:
On the Tools menu, click Customize.
The Customize dialog box is displayed.
In the Toolbars tab, click New.
The New Toolbar dialog box is displayed.
Enter a name for the new toolbar, select the location and click OK.
In the Commands tab, click on Rearrange Commands.
Select Toolbar.
From the drop down list, choose the new toolbar to rearrange.
To select and arrange commands for the new toolbar, use the Add, Delete, Move Up and Move Down buttons.
To apply the changes, click Close.
OR
To cancel the changes, click Reset.
Click and drag a toolbar handle  to move the toolbar.
|
|
|
|
|
|
To hide/show selected toolbars:
On the View menu, click Toolbars.
Click the toolbars you want to hide/show.
To hide/show the FindBar:
On the Tools menu, click Find.
Click the Find option.
Resetting menu and toolbar customizations
To reset your customizations to one or more toolbars:
On the Tools menu, click Customize.
The Customize dialog box is displayed.
On the Toolbars tab, click the toolbar you want to reset.
Click the Reset button.
The Confirm Toolbar Reset dialog box is displayed.
Click OK.
To reset all your customizations to NVivo menus and toolbars:
On the Tools menu, click ResetCustomizations.
The Reset Customizations dialog box is displayed.
|
|
By default, NVivo will reset all your customizations to toolbars, menus and List Views. |
|
|
|
If you want to keep your List View customizations, you must clear the List views check box.
Click OK.
|
|
If you remove the Tools menu (or the Reset Customizations option on it) you can still reset by right-clicking in the toolbar area and selecting the Customize option. If you rearrange menus and toolbars, related Help content may no longer be applicable. |
|
|
|
To hide the shapes palette while you are working in a model:
Click the View menu.
Click the Models Shapes Palette option.
To hide the Groups panels that are displayed on the right of Detail View:
On the View menu, click Model Groups.
To display a specific panel click:
Custom Groups
Project Groups
![]()


