Many research projects involve multiple researchers—either to work through a large volume of data or to bring different perspectives to the project.
Where different researchers contribute to a project, it can be important to keep track of the similarities and differences in their analysis. For example, you may want to ask the questions:
Are team members coding and using the node structure in a consistent way?
Do differences in coding reveal any interesting insights that the team may want to pursue and discuss?
Which sources have been created or modified by a specific user?
NVivo provides 'user profiles' as a way of tracking the work done by different researchers on a project.
A user profile includes the name and initials of a team member. When you first launch NVivo, you are prompted to enter your user profile—the default is based on your Windows login details but you can change the name or initials if required.
If multiple users will be accessing NVivo on the same computer with the same Windows login details, you can prompt them for their user profile each time they launch the application. To do this:
On the Tools menu, click Options.
The Application Options dialog box is displayed.
In the General tab, select Prompt for user on launch.
You can change the current user while working on an open project. Refer to Changing the Current User for more information.
You can see all the team members that have contributed to a project. Refer to Setting Project Properties (Users tab) for more information.
You can merge the work of two team members by removing one of the user profiles and reassigning all associated project content to the other user. Refer to Removing User Profiles for more information.
NVivo records the tasks done on the project against the current user profile.
When you are working in List View, you can see the created and modified user details for each item. You can click on the Created By or Modified By column header to sort the list. View example

|
|
NVivo does not track detailed edits in project items. For example, you can check who last edited the text in a source but you cannot see what changes they made. 'Modified' only shows the details of the latest team member who changed a project item. |
|
|
|
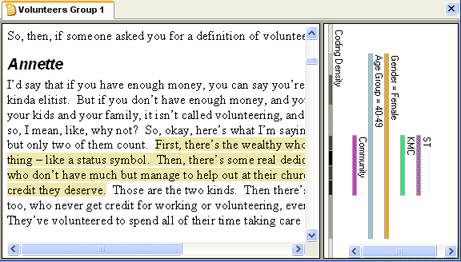
You can use coding stripes to see the content coded by selected team members to one or more nodes. View example
|
|
These stripes show that the highlighted content was coded by KMC and ST
When you hover over the stripes, you will see which nodes were used
|
You can also highlight the content coded by selected team members—refer to Highlight Coding for more information.
When exploring a node in Detail View, you can choose to display only the content coded by selected users. For example, you may want to see only your own coding or the coding of another team member. Refer to Filtering Nodes by User for more information.
You can include team members in the scope of coding queries. For example, you can search for all coding at the node community that was done by a selected team member. Refer to Simple Coding Queries and Advanced Coding Queries for details on running this type of query.
To compare the coding of two users, you can run a Coding Comparison Query—refer to Coding Comparison Queries for more information.
![]()
![]()