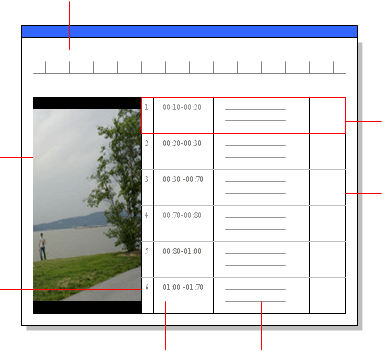
Timeline
Media
Row ID

Transcript Entry
Custom Column (optional)
Timespan Content
A video or audio source consists of a media file and a transcript:
|
|
Timeline |
|
|
Media
Row ID
|
|
Transcript Entry
Custom Column (optional) |
|
|
Timespan Content |
|
When you import an audio or video file, NVivo creates a new source containing the media and an 'empty' transcript.
Transcripts are optional. You can leave the transcript empty and hide it if required—on the View menu, click the Transcript option.
If you want to transcribe the media, you can enter or import the required content. For more information, refer to Importing Transcripts and Adding and Organizing Transcript Entries.
You can code the audio or video directly by clicking and dragging the mouse over a portion of the Timeline to select and code the required content— refer to Selecting Sections of a Media File for more information about selecting media. You can also code the text in the Content column of the transcript.
If you code the transcript, then the related timespan of media will be 'shadow' coded. Similarly, if you code the media, the corresponding transcript entries are also shadow coded.
Refer to Coding Video/Audio Sources for more information.
When you create a new audio or video source, you can choose to embed the media file in your project or set up a link to a media file on your computer or network.
Storing media outside of the project can be useful when you are dealing with many or very large media files —embedding large files can impact on project performance. Refer to Storing Audio and Video for more information.
You can change the name and description of your audio/video source. Depending on the file size, you can also choose to embed the media file within the project or store it externally in a folder on your computer or network.
To view Audio/Video Properties:
In List View, click on the source.
Click on the Project Menu.
Select Audio/Video Properties.
This will display the properties dialog.
In the General tab, you can view or change the Name and Description fields. You can also prevent any changes to the transcript by selecting Read-only.
In the Audio/Video tab, you can view the audio/video file properties:
Embedded in project - indicates that the media content is stored within the project (maximum size allowed for embedding is 40MB)
Not embedded—file location: - indicates that the media content is stored in a file outside the NVivo project
Click OK to save any changes, or Cancel to close the dialog box.